DIY Chicken Tractor from an IBC Tote – Simple and Cheap!
Post may contain affiliate links. Read our disclosure policy.
In this comprehensive guide, learn how to create your very own DIY chicken tractor using a 275-gallon IBC tote. This simple yet effective project not only provides a safe space for your backyard chickens but also enhances your homesteading experience. This is a great way and a cheap solution to house your meat birds or little birds that are not ready to go into the coop with the full flock of chickens yet.
Introduction to the DIY Chicken Tractor
Building this IBC tote frame chicken tractor is an exciting venture that combines creativity and practicality and is great for any skill level. Utilizing an IBC tote not only makes this project eco-friendly but also a cost-effective portable shelter. Because of the materials used, this project is extremely lightweight; even our daughters can lift it; however, the low profile makes it resistant to being blown around by the wind. We live in Oklahoma, where the wind really does come sweeping down the plains, and have never had issues with it being blown around. This guide will take you through the process of transforming an ordinary IBC tote into a simple chicken tractor that can provide a safe and comfortable environment for your meat chickens or your small flock. You can also let your older baby chicks get some outside time while being protected.
Why Use a Chicken Tractor
Using a chicken tractor offers numerous benefits for both your chickens and your land. This is basically a portable chicken coop plan that allows you to move your flock to a different spot with patches of fresh grass regularly, providing them with access to a variety of insects, seeds, and plants while naturally foraging. This combats some problems backyard chicken owners face and promotes healthier, happier birds and results in more nutrient-dense eggs and meat. Additionally, as the chickens graze, they aerate the soil with their scratching and fertilize it with their manure, creating a sustainable, chemical-free method of enriching your garden or pasture. The best part about chicken tractors is that they provide a safe, contained environment that is predator proof while allowing them to enjoy the benefits of free-ranging like not spending as much money on feed. Easy to manage and eco-friendly, they are a fantastic option for backyard poultry keepers.
Understanding the IBC Tote
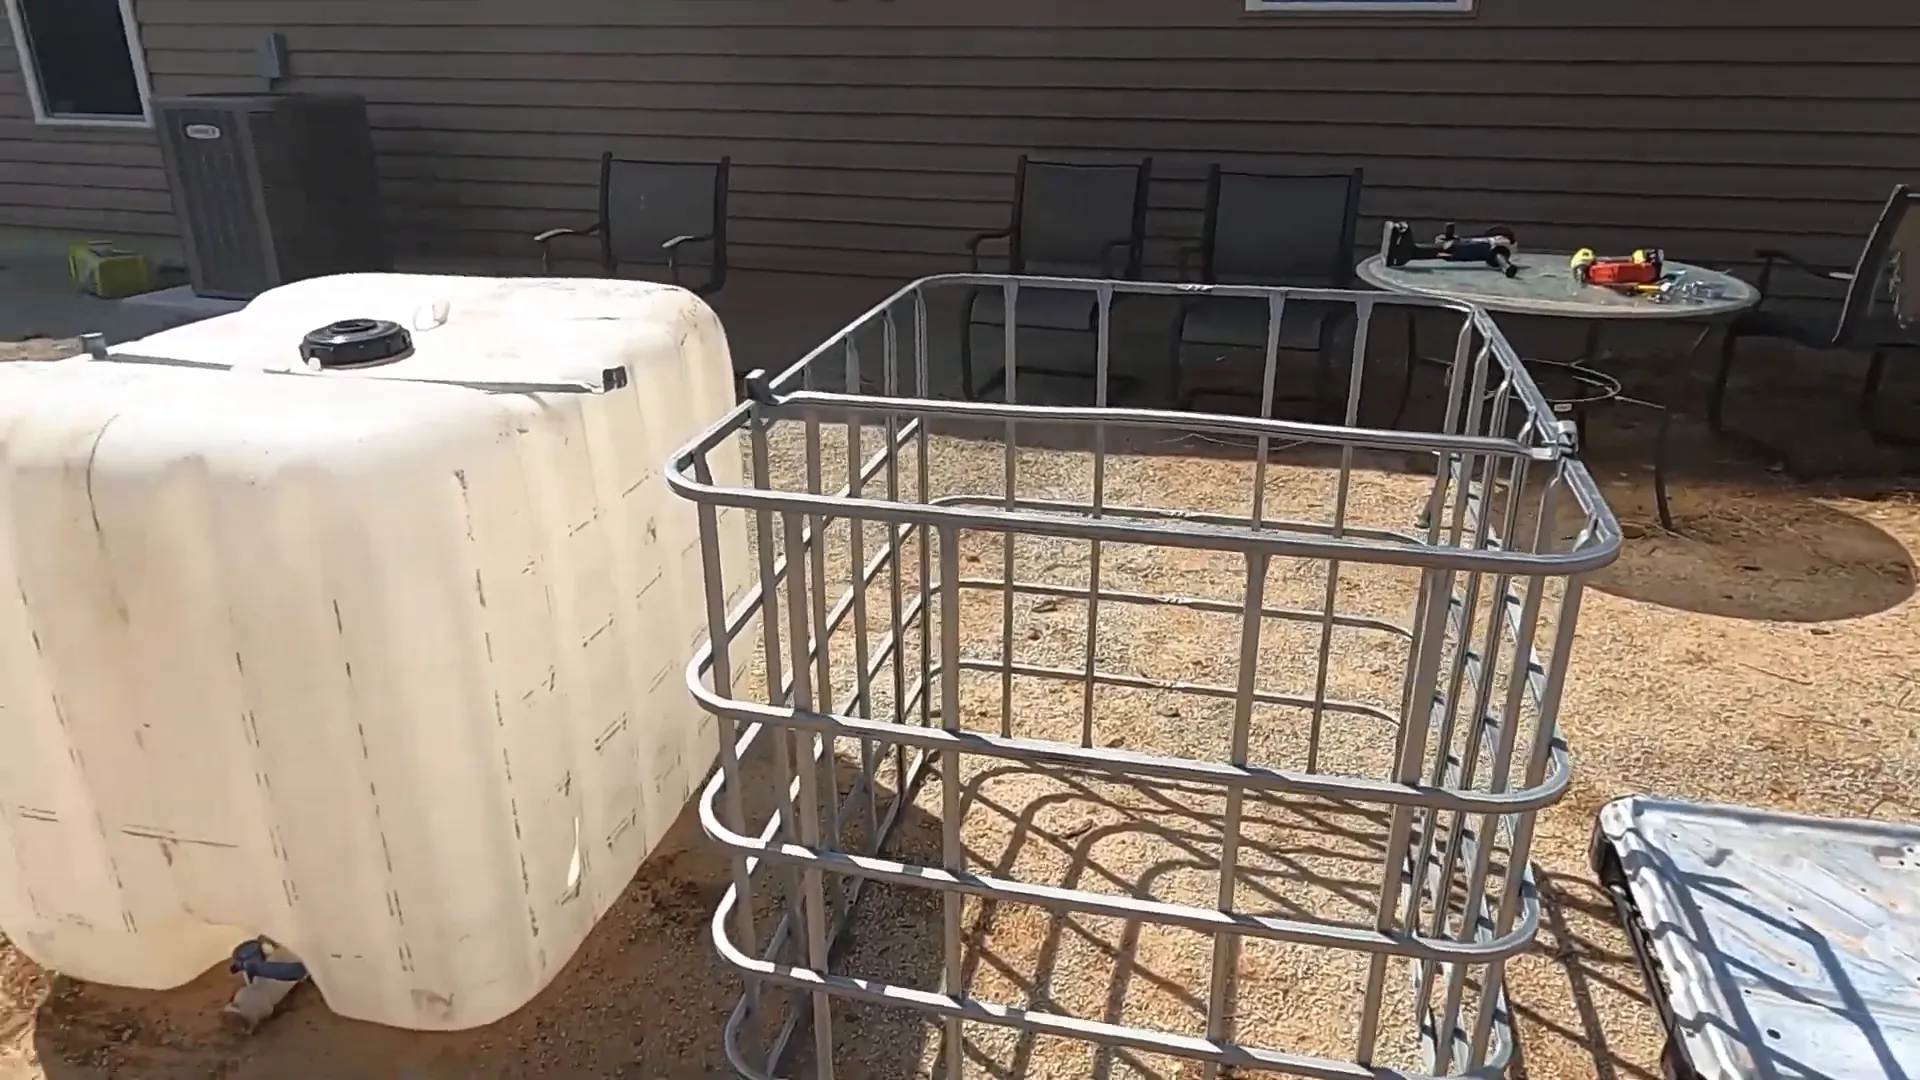
IBC totes, or Intermediate Bulk Containers, are large containers typically used for transporting liquids. A standard 275-gallon IBC tote consists of a plastic bladder encased in a metal frame, making it both sturdy and lightweight. The design allows for easy movement, which is ideal for a chicken tractor that needs to be relocated frequently.
When selecting an IBC tote for your project, ensure that it has been cleaned and is free of any harmful chemicals. The tote’s structure will serve as the foundation for the chicken tractor, providing both shelter and protection for your flock.
Planning Ahead for your DIY Chicken Tractor
It doesn’t get much easier than this! In an hour or less, you can construct a lightweight, sturdy, weather-proof, super-simple chicken tractor from a used 275-gallon IBC tote, with barely any extra materials needed! You can find used IBC totes easily between $50 and $100 dollars by looking on Facebook Marketplace or any other place where folks sell used items locally. Food grade is preferred but more expensive. Some people will clean them for you, or you can save money by cleaning them yourself.
If it’s not food grade, make sure you know what was in it before cleaning it out or using it for animal shelters!
Materials required:
- $50 ~ $100 – 1 275 Gallon IBC tote (square cage rails preferred)
- $22 – 25 feet of 3′ wide chicken wire (this is enough for 2 chicken tractors!)
- $12 – 6 stainless steel hose clamps (3/4″ – 1 3/4″ size)
- $10 – 140 pack self-tapping sheet metal screws (I used #10 x 1″ and only needed 6 of them)
- $10 – 100 pack (used about 50) UV resistant 8″ zip ties
Total project cost for a single tractor: ~$100
Tools used:
- Ryobi cordless drill
- Ryobi cordless angle grinder
- Scissors (or knife)
- Level (or yardstick, broom handle, anything to help draw a straight line)
You’ll have enough plastic bladder left over for a waterer, planter, animal shelter, or other creative ideas as well as a nice sturdy metal pallet.
Designing the DIY Chicken Tractor
The design of your chicken tractor is crucial for its functionality. Consider the dimensions of the IBC tote, which are approximately 40 inches wide and 48 inches deep. The goal is to maximize the surface area while ensuring that the structure is easy to move.
One effective approach is to cut the IBC tote in a way that allows for a flat base. This provides stability while also giving your chickens ample space to roam. It’s essential to consider the placement of the spout and lid, ensuring they do not interfere with the overall design.
Initial Cuts and Adjustments
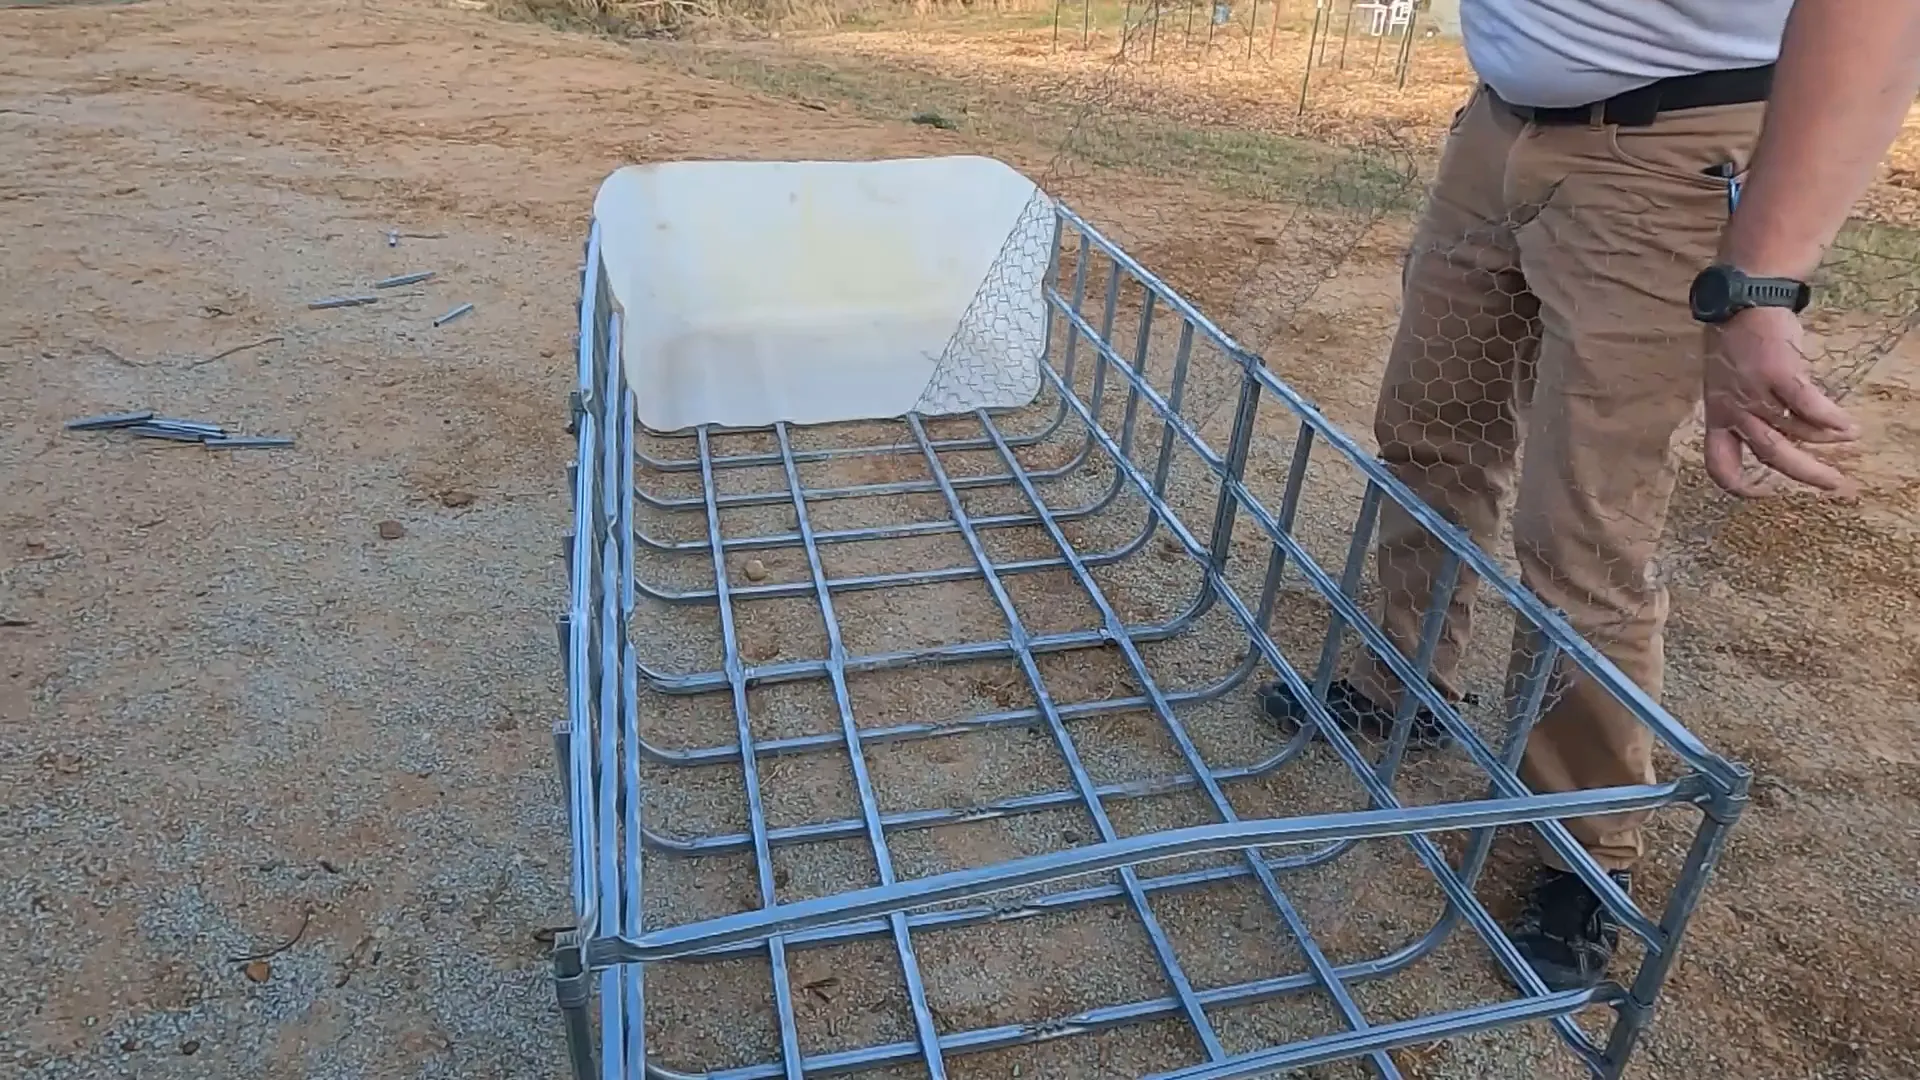
Once you have a clear design in mind, the next step involves making precise cuts to the IBC tote. Start by disassembling the cage and bladder, ensuring you keep track of all parts. Use a cutting tool to carefully slice through the cage, aiming for clean edges that will fit together seamlessly.
Cutting the Cage
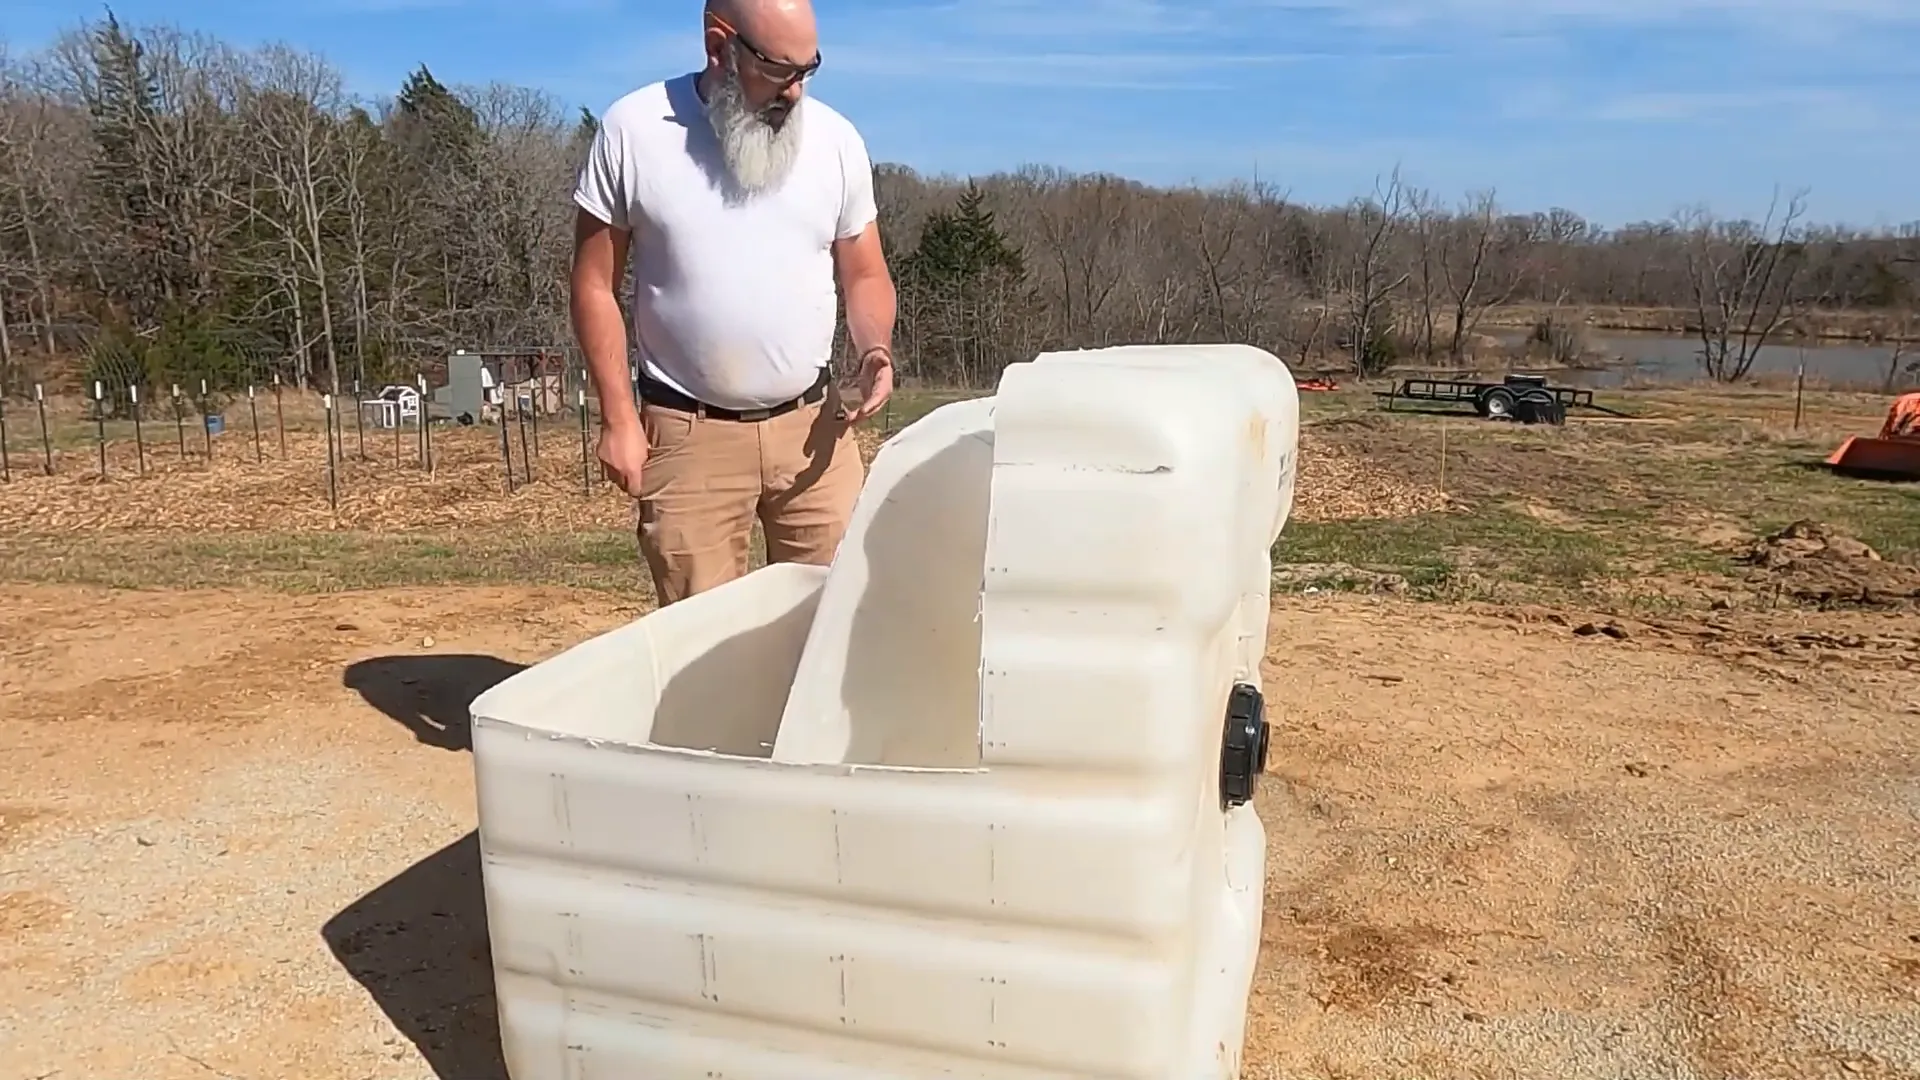
With the cage now cut in half, it’s time to focus on the plastic bladder. This step is crucial, as it will determine how well the bladder fits within the frame. Using a Sharpie, draw your cutting lines carefully based on the measurements you’ve taken from the cage. Be sure you measure twice and cut once!
Ensure you have a stable surface while cutting. A clean cut will help maintain the integrity of the bladder, making it easier to attach later. Remember, precision is key here.
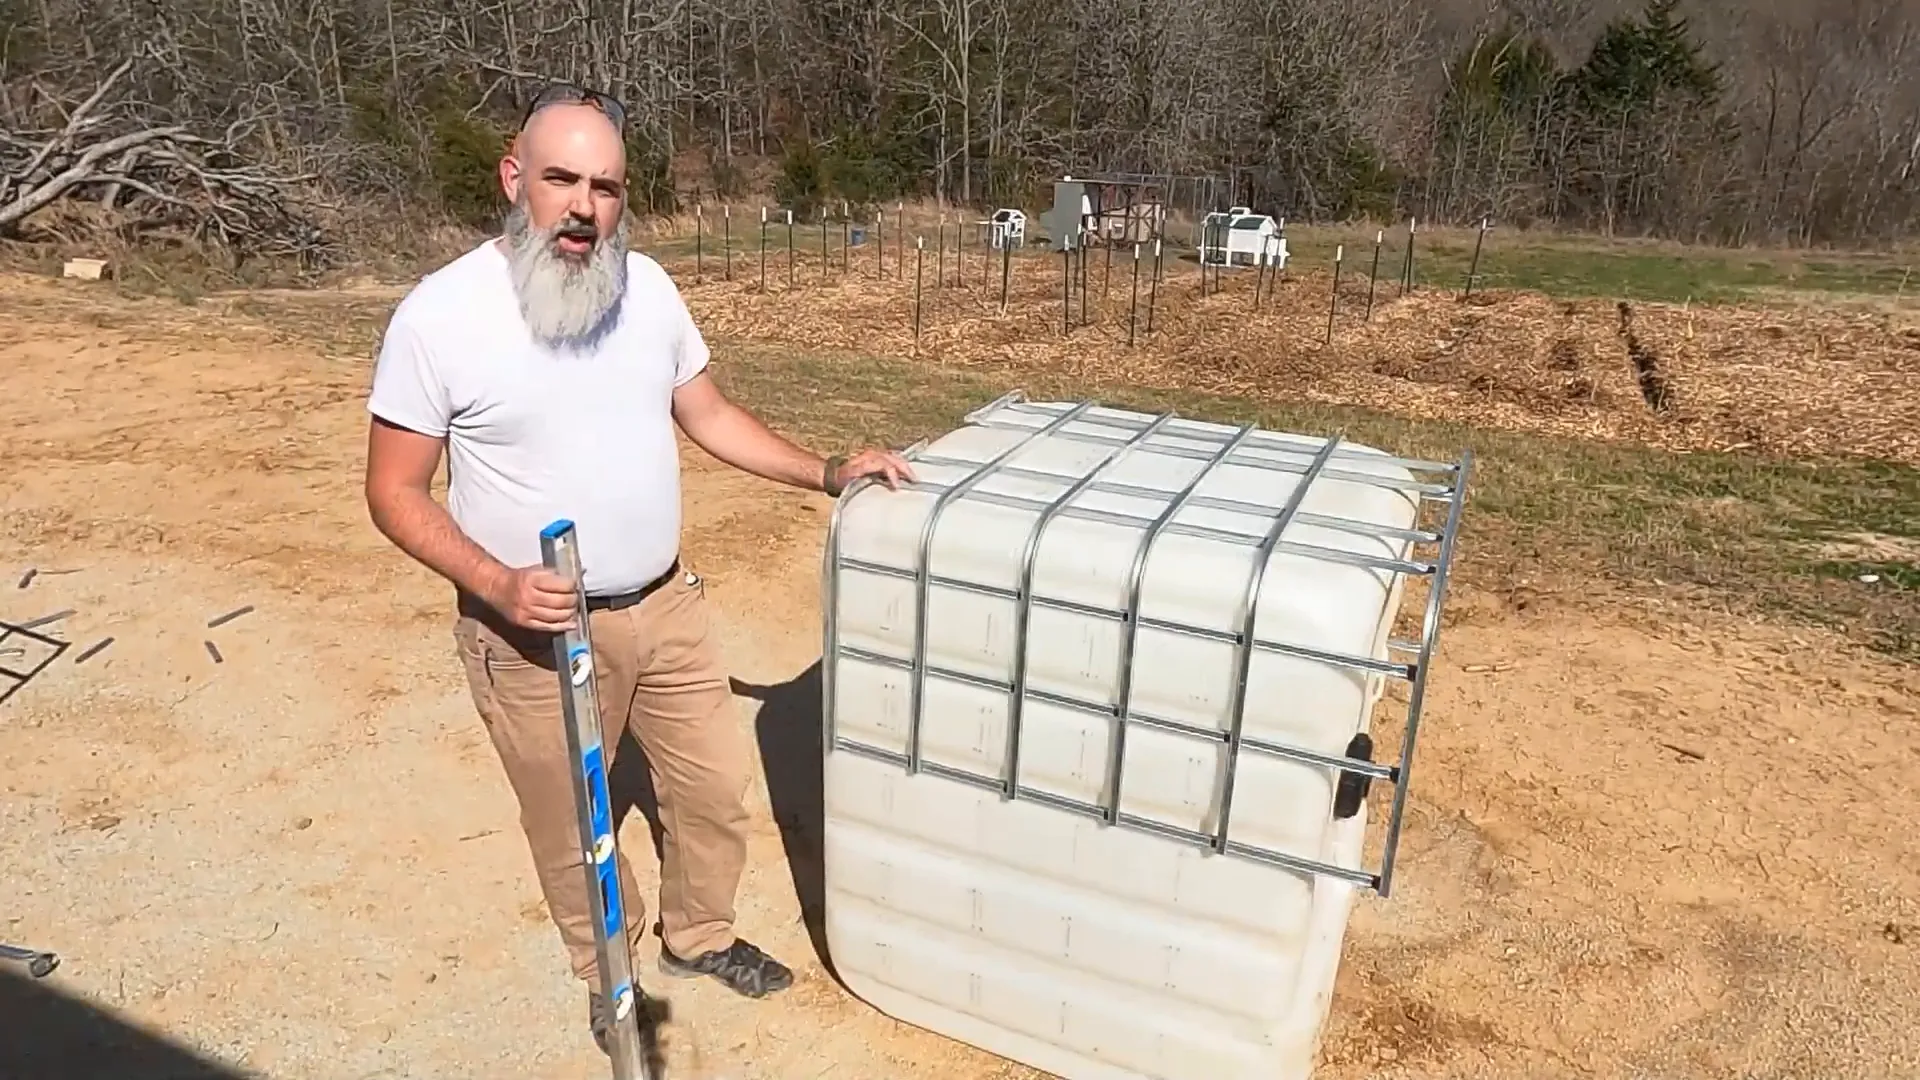
Preparing the Bladder for Cutting the DIY Chicken Tractor
Before cutting the bladder, double-check your measurements. Align the bladder with the frame to visualize how it will fit. Using a level can help you draw straight lines, ensuring a snug fit that is the right size for your project.
Once you have your lines marked, proceed with cutting the bladder carefully. Ensure the edges are clean to avoid any tears or damage that could compromise its functionality.
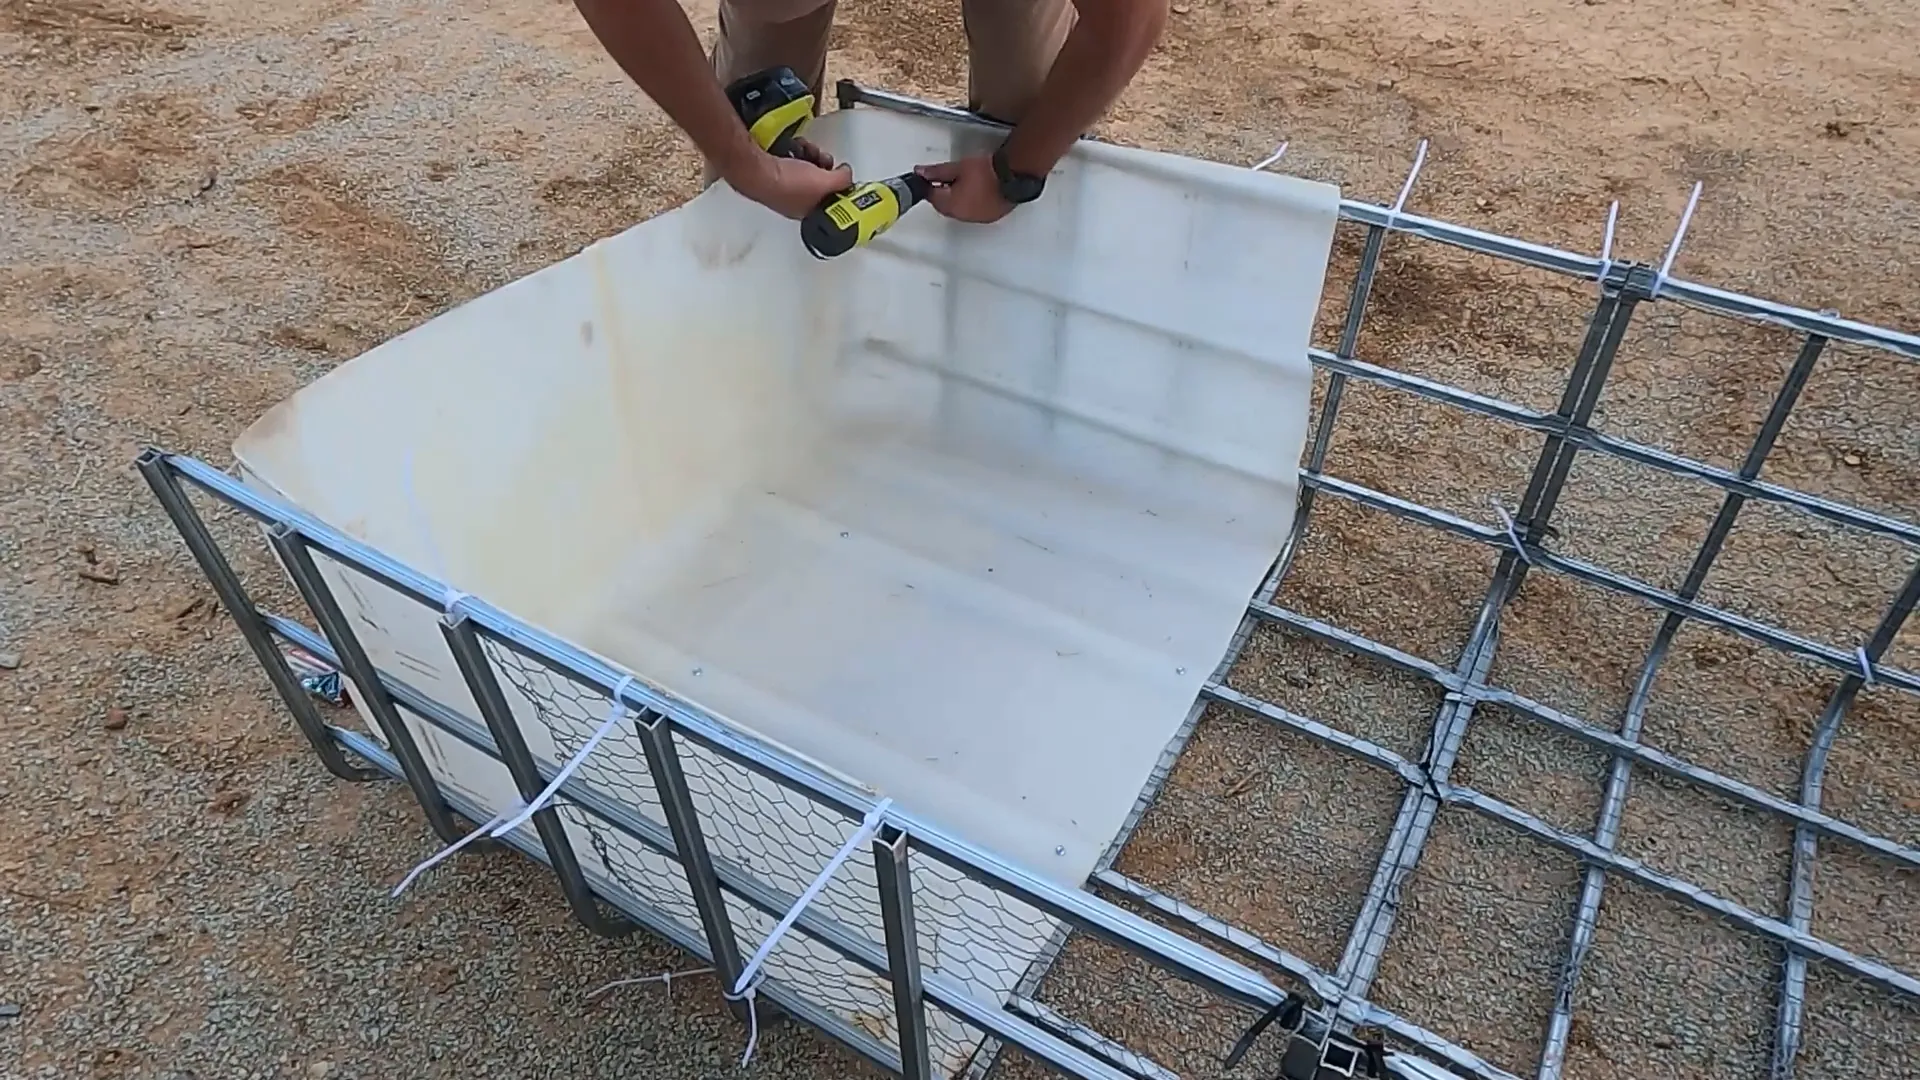
Affixing the Plastic Bladder
Now that the bladder is cut, the next step is to secure it to the frame. This is where the rigidity of the structure comes into play. The two pieces that previously held the bladder in place will be repurposed to strengthen the overall design.
Using self-tapping sheet metal screws, attach the bladder to the frame. This will ensure that it remains secure and that critters cannot easily pull it out. Make sure to drill through both the bladder and the frame for a solid hold.
Choosing the Right Fasteners
Selecting the appropriate fasteners is critical for the stability of your DIY chicken tractor. You have several options, including hose clamps, sheet metal screws, and bolts with nuts. Consider the weight and material of the bladder and frame when making your choice.
Hose clamps can be effective but may require specific sizes for a tight fit. On the other hand, sheet metal screws provide a direct attachment but might need to be longer to penetrate both layers securely. Assess your materials carefully to determine the best option. If you watch the video, you will see that I had to make several trips to the hardware store while I was going through the process of trial and error.
Testing Fastening Methods
Before finalizing your fastening method, it’s essential to test a few options. Start with the self-tapping screws on some scrap pieces to gauge their effectiveness. Pay attention to how well they hold and whether they penetrate through both layers adequately.
If the screws aren’t holding securely, consider switching to larger hose clamps or using bolts and nuts. The goal is to create a robust structure that can withstand the elements and the activity of your chickens.
Finalizing the Structure
With the bladder securely attached to the frame, it’s time to finalize the structure of your DIY chicken tractor. This step ensures that everything is snug and ready for the chickens. Start by ensuring that all fasteners are tightened properly, and the overall structure feels stable. We have had this chicken tractor for three years now and it is still holding up well.
Next, assess any areas that may need additional support. If you notice any wobbling or instability, consider adding more screws or zip ties to reinforce these sections. The goal is to provide a solid base that will withstand the movements of your chickens.
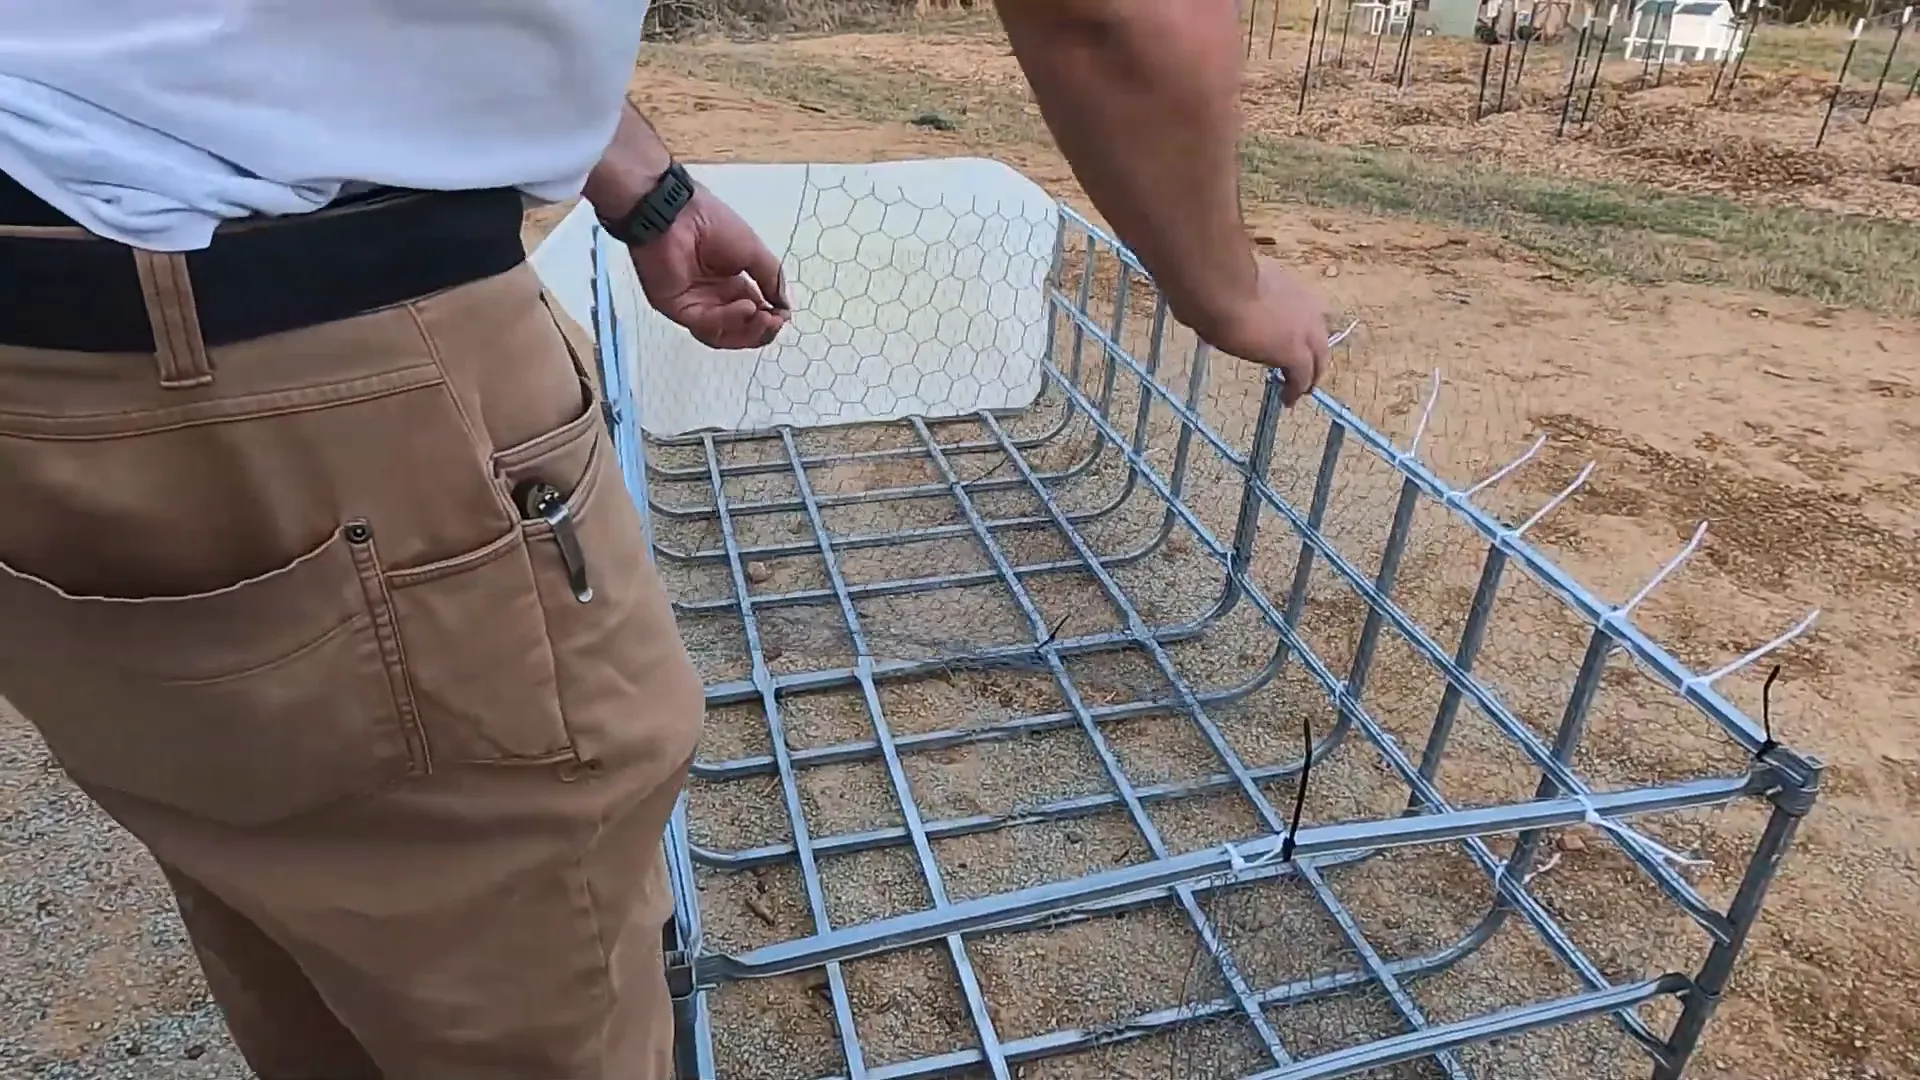
Lining with Chicken Wire
Now, it’s time to line the interior of the chicken tractor with chicken wire or even hardware cloth. This is a crucial step to keep your chickens safe from predators while allowing them to enjoy the outdoors. Measure out enough chicken wire to cover the entire inside area, ensuring it extends slightly beyond the edges of the frame.
For this project, a piece of chicken wire that is seven feet long and three feet wide works well. You will need two sheets to create a secure barrier around the entire interior. This overlapping will help eliminate any gaps where a predator might squeeze through.
Attaching the Chicken Wire
Once you have your chicken wire cut to size, it’s time to attach it to the frame. Using zip ties is an efficient method for securing the wire. Start at one corner and work your way around, ensuring the wire is pulled tight against the frame.
As you attach the chicken wire, remember to fold it over any corners to create a snug fit. This method is similar to wrapping a present, where you overlap the wire to maintain coverage and security. Be sure to check that there are no sharp edges sticking out that could harm your chickens. If you find some make sure to bend them or cut them off.
Final Assembly and Adjustments
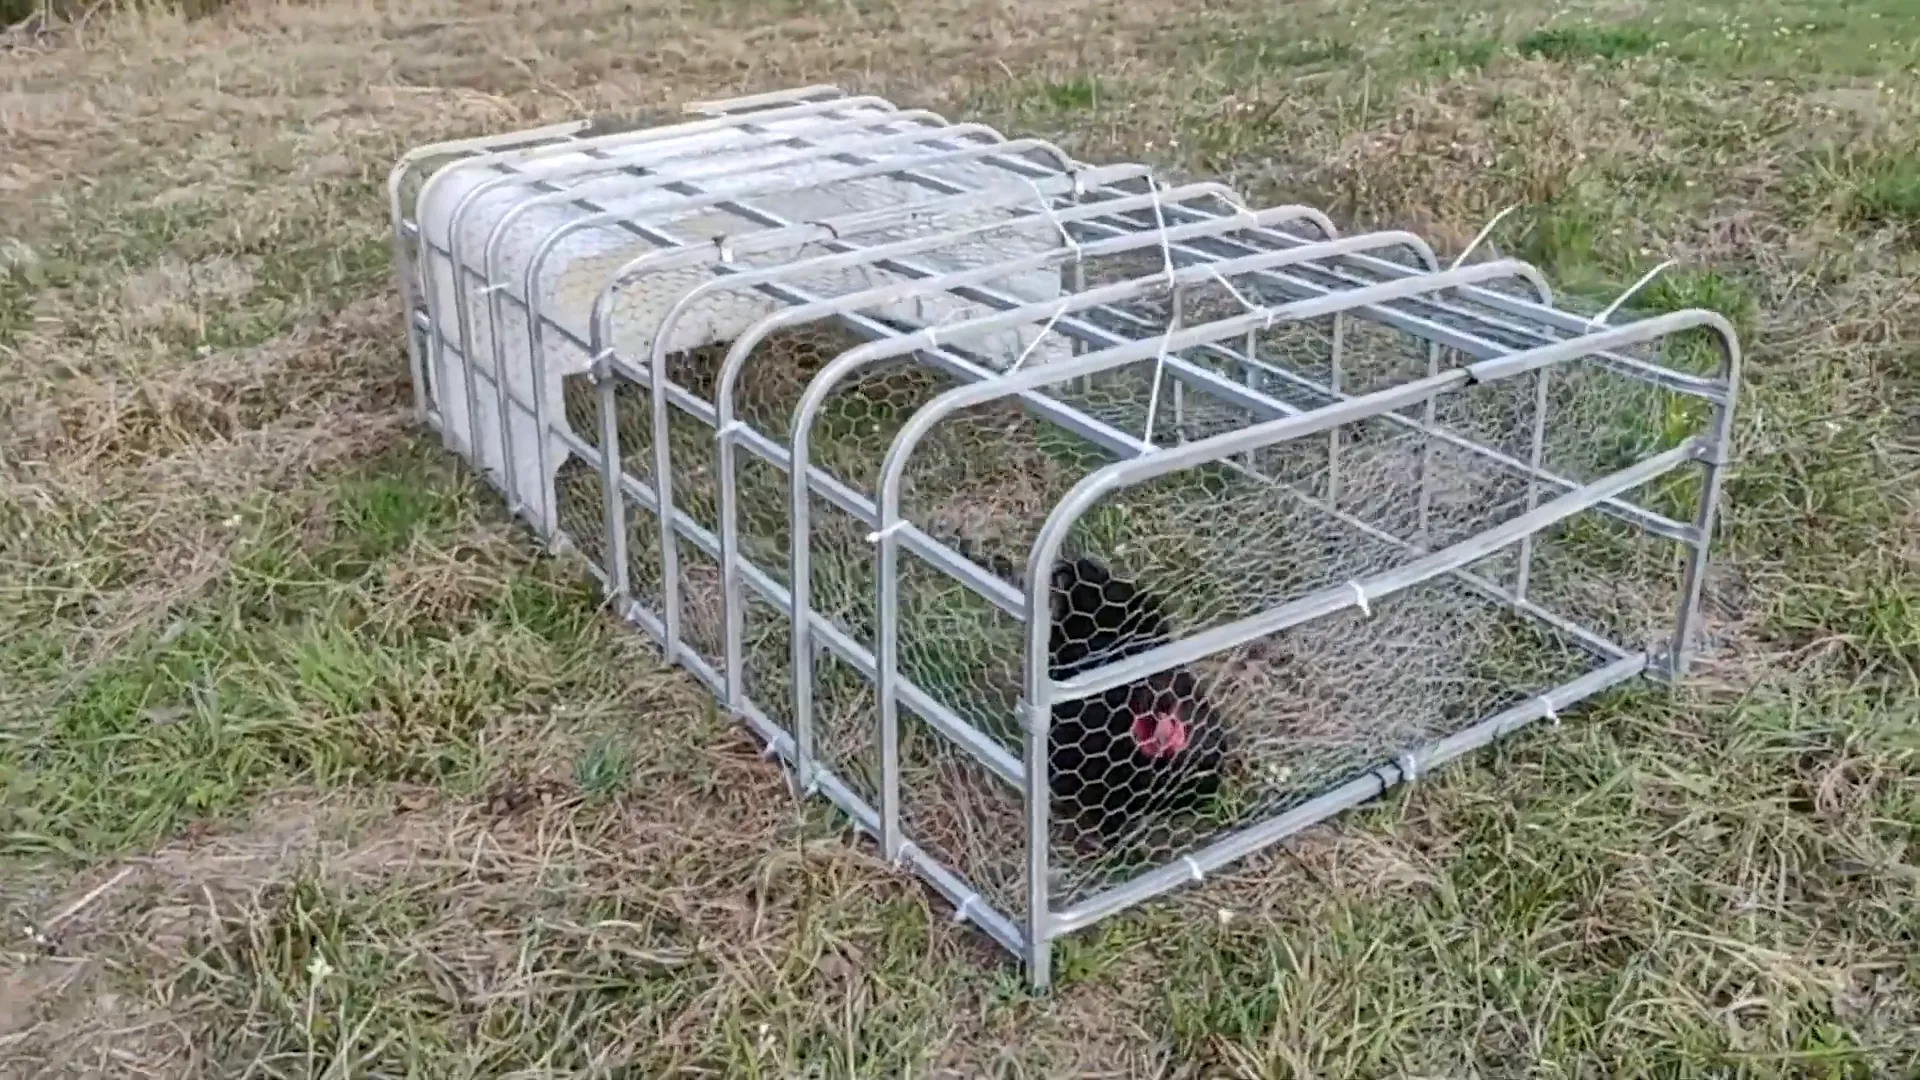
After the chicken wire is securely in place, conduct a final check of all connections. It’s a good idea to look for any loose zip ties or screws that may need tightening. This is also the time to trim any excess chicken wire or zip ties that may be protruding from the tractor.
Once everything is secure, flip the chicken tractor over to assess the bottom. If you plan to place it directly on the ground, consider adding a layer of protection against moisture. Pieces of wood or similar material can help keep the bottom dry and increase the longevity of your DIY chicken tractor. If you have a risk of a predator attack, you can add hardware cloth or chicken wire to the bottom. As for feeding, we dump the chicken feed in and let them scratch for it and we always have a water container inside that they can access.
Conclusion
Congratulations! You’ve successfully built your own DIY chicken tractor using an IBC tote. This is a good design for a mobile coop that not only provides a safe space for your chickens but also enhances your homesteading experience. Remember, each build can be customized to fit your specific needs. Add nest boxes, a roosting area, or a door frame, the customization is endless on this chicken tractor design.
Building a chicken tractor from an IBC tote is a practical, cost-effective way to provide your flock with a safe, portable, and enriching environment. By repurposing materials, you can create a durable and functional structure that allows your chickens to graze freely while staying protected from predators. This project not only benefits your birds but also supports sustainable farming practices by reducing waste and improving soil health. With a bit of effort and creativity, your DIY chicken tractor will become an invaluable addition to your homestead, making it easier to care for your chickens and maintain a thriving, eco-friendly setup.
If you found this DIY chicken tractor guide helpful, please leave a comment below. Be sure to share your experiences or any tips you might have for others looking to build their own chicken tractor. Engaging with the community can provide valuable insights and encouragement for future projects!
We’d love to hear how your DIY chicken tractor turns out. Don’t hesitate to post photos or updates on your progress. Good luck and happy building!
Shop This Post:
- Chicken Wire
- Hose Clamps
- Self-tapping Sheet Metal Screws
- UV resistant 8″ zip ties
- Ryobi cordless drill
- Ryobi cordless angle grinder
- Level


I really enjoyed your video! It’s a very good idea for a chicken tractor. Very inspiring!
Thank you!!!