How to Make Healing Lavender Salve: Skin Soothing Recipe
Post may contain affiliate links. Read our disclosure policy.
Learn how to make your own lavender salve at home! This all-natural remedy is great for calming bug bites, cuts, sunburn, and dry skin—it’s a must-have for your gardening toolkit!
Introduction to Lavender Salve
Lavender salve is a super handy and soothing remedy made with the calming power of lavender and nourishing oils. It’s all-natural and perfect for treating everything from minor burns and cuts to dry, irritated skin. Plus, the lovely lavender scent isn’t just refreshing—it also helps with relaxation and stress relief, making it a must-have in your home remedy kit!
Benefits of Lavender Salve
Lavender salve has more than just a lovely scent—it’s packed with benefits! Here’s why you’ll want to keep it around:
- Soothing: Lavender’s anti-inflammatory and antiseptic properties help calm irritated skin.
- Healing: It’s great for minor cuts, scrapes, and burns, helping to speed up healing and reduce infection risk.
- Moisturizing: The nourishing oils in the salve keep your skin hydrated, preventing dryness and cracks.
- Relaxing: The calming lavender scent can help ease anxiety and promote relaxation, soothing both body and mind.
- Natural: Made with all-natural ingredients, lavender salve is free from harsh chemicals and synthetic fragrances.
Gathering Ingredients
Homemade lavender salve is simple, and all you need are a few key ingredients. It’s easy to make in large or small batches. Here’s what to gather:
- 12 ounces of carrier oil: Fractionated coconut oil works great, but you can also use jojoba or sweet almond oil.
- 1 ounce of dried lavender buds: Dried lavender flowers work best for infusion.
- 2 ounces of beeswax pastilles: This helps solidify the salve.
- Optional: Vitamin E oil for an extra boost of skin nourishment.
Understanding Carrier Oils
Carrier oils are the base of your lavender salve, helping to dilute the essential oils and nourish your skin. Here are a few popular options:
- Fractionated Coconut Oil: Liquid at room temperature, it absorbs easily and is fantastic for skin health.
- Jojoba Oil: It’s similar to your skin’s natural oils, making it a great moisturizer.
- Sweet Almond Oil: Packed with vitamins A and E, it’s perfect for soothing dry skin.
Pick a carrier oil that works best for your skin type and personal preference. Each oil has its own special benefits, making your salve even more effective!
Measuring the Ingredients
Getting the measurements just right is keyto this lavender salve recipe. Here’s how to do it:
- Grab a kitchen scale and measure your carrier oil. Just place a bowl on the scale, zero it out, and add the oil.
- Measure out 1 ounce of dried lavender buds the same way.
- For the beeswax, measure 2 ounces. Make sure it’s finely grated or in small pellets to melt easily.
Sticking to the right measurements will help you get the perfect texture and effectiveness in your salve!

Infusing the Oil
Infusing the oil is a key step in making your lavender salve. This is where all the good stuff from the lavender gets into the carrier oil, creating a fragrant, healing base for your salve.
To infuse the oil, start by grinding your dried lavender buds with a mortar and pestle or a food processor. This helps release more of the lavender’s goodness. Once it’s ground, mix it with your chosen carrier oil in an oven-safe dish.

Set your oven to a low temperature—below 140 degrees Fahrenheit works best. If your oven doesn’t go that low, the bread proof setting is perfect. Let the mixture infuse for about six hours, making sure the lavender is fully submerged in the oil.
If you’d rather take the long way, you can also do a cold infusion. Just put the mixture in a jar and leave it in a sunny window for about a week. It takes more time, but you’ll still get all those lovely lavender benefits!
Straining the Infused Oil
Once your oil is infused, it’s time to strain out the lavender bits. This step makes sure your salve turns out smooth and silky.
Grab a fine mesh strainer lined with cheesecloth, and pour the infused oil through it into a clean container. The oil might still be warm, so be careful! Gently squeeze the cheesecloth to get out as much oil as you can. What you’ll be left with is a fragrant lavender-infused oil, ready for the next step.
Don’t toss the leftover lavender solids! They’re perfect for other DIY projects or even for making potpourri.
Combining with Beeswax
Next, you’ll mix your infused oil with beeswax to get that perfect salve consistency. Beeswax is a natural thickener that helps your salve solidify.
Measure out two ounces of organic beeswax pellets, and if you’re using a double boiler or stovetop, melt the beeswax slowly over low heat. Be careful not to overheat it, as high temps can mess with the oil’s goodness.
Once the beeswax is melted, gradually stir in your lavender-infused oil. Keep stirring until everything is well blended and smooth. If you want, you can add a few drops of vitamin E oil for an extra skin boost! If you want a slightly stronger salve with a more potent scent, you can even add a few drops of pure lavender essential oil.
Storing Your Lavender Salve
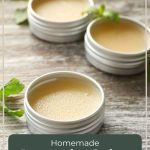
Once you’ve mixed the infused oil with beeswax, it’s time to store your lavender salve. Pick small containers or tins that seal tightly to keep it fresh and effective. I used a two oz metal tin.
Pour the warm mixture into your containers, but be quick— it’ll start to solidify as it cools. Let the salve cool completely at room temperature before sealing the containers to ensure a smooth texture.
If stored properly, your lavender salve will last for months. Just keep it in a cool, dry spot away from direct sunlight to keep it in top shape!
Great Uses for Lavender Salve
Lavender salve is a super handy remedy with so many uses! Here are a few of the most popular ways to use it:
- Soothing Skin Irritations: Dab it on insect bites, minor cuts, or scrapes to help them heal and reduce swelling.
- Moisturizing Dry Hands: Smooth it on dry or cracked skin to bring back moisture and get some relief.
- Alleviating Sunburn: Gently rub it on sunburned areas to calm the discomfort and help your skin recover.
- Relaxation Aid: The soothing lavender scent is the perfect solution to ease stress and anxiety while you apply it.
And not only is it super practical, but lavender salve also makes a thoughtful gift, especially for anyone who loves natural remedies!
Conclusion and Next Steps
Making your own lavender salve is a fun and easy way to create a soothing experience that’s good for your skin and smells amazing. With just a few natural ingredients, you’ve got yourself a DIY product that’ll leave you feeling relaxed and refreshed!
Whether you’re gearing up for gardening season or just want to give your skin some TLC, lavender salve is a must-have in your collection. It’s comforting, nourishing, and so simple to make.
Now that you know the basics, why not try experimenting with other herbs and oils? You can mix and match to create your own custom blends. Happy crafting!
Ready to go deeper with herbs? Herbal Academy is where I’ve done my own herbal studies. Find their courses HERE.
Soothing Lavender Salve
Learn how to make your own lavender salve at home! This all-natural remedy is great for calming bug bites, cuts, sunburn, and dry skin—it’s a must-have for your herbal first-aid kit!
- Prep Time: 10 minutes
- Cook Time: 6 hours
- Total Time: 6 hours 10 minutes
Ingredients
- 12 ounces of carrier oil: Fractionated coconut oil works great, but you can also use jojoba or sweet almond oil.
- 1 ounce of dried lavender buds: Dried lavender flowers work best for infusion.
- 2 ounces of beeswax pastilles: This helps solidify the salve.
- Optional: Vitamin E oil for an extra boost of skin nourishment.
- Optional: Lavender essential oil
Instructions
Infuse the Oil:
- Grind the Lavender: Use a mortar and pestle or a food processor to grind the dried lavender buds. This helps release more of its natural goodness.
- Combine with Oil: Place the ground lavender into an oven-safe dish and pour your chosen carrier oil over it.
- Infuse the Oil:
- Set your oven to a low temperature, ideally below 140°F. If your oven doesn’t go that low, the bread proof setting works great.
- Let the mixture infuse for about 6 hours, making sure the lavender is fully submerged in the oil. (Alternatively, for a cold infusion, place the mixture in a jar and leave it in a sunny window for about a week.)
Strain the Infused Oil:
- Prepare to Strain: Set up a fine mesh strainer lined with cheesecloth over a clean container.
- Strain the Oil: Carefully pour the infused oil through the strainer, making sure to squeeze the cheesecloth gently to extract as much oil as possible.
- Save the Leftovers: Don’t toss the lavender solids! You can use them for potpourri or other DIY projects.
Combine with Beeswax:
- Melt the Beeswax: Measure out 2 ounces of beeswax pellets and melt them gently over low heat using a double boiler or stovetop. Be careful not to overheat.
- Mix in the Infused Oil: Slowly stir the lavender-infused oil into the melted beeswax, mixing until fully combined and smooth.
- Optional Add-ins: Add a few drops of vitamin E oil for extra skin benefits, or lavender essential oil for a stronger scent.
Store Your Salve:
- Fill Containers: Quickly pour the warm salve mixture into small, tightly sealed containers or tins.
- Cool and Set: Let the salve cool completely at room temperature before sealing to ensure a smooth texture.
- Store Properly: Keep your lavender salve in a cool, dry place, away from direct sunlight, to preserve its freshness. It will last for months when stored correctly!


I can’t wait to try this! Thank you for the easy step by step instructions. I am going to use this for my son at bedtime to help him sleep better!
That sounds like a fantastic idea! I hope it helps!